Premium WikiJS hosting on the fastest most affordable hosting platform.
The most powerful and extensible open source Wiki software. Write beautiful documentation using a modern UI and advanced features.

How to deploy your WikiJS Cloud VPS
Deploying apps on Cloudfanatic cloud vps is easy and fast. All you have to do is decide which plan you want to go with and then select “WikiJS Appliance” as operating system. Our system will being provisioning your server instantly and upon first boot will install all required packages for you. All you have to do is sit back and relax while the process finishes.


Pick the plan you need.
With our 1-Click WikiJS deployment, your server will be provisioned and WikiJS automatically installed. You can begin customizing your new WikiJS within a few minutes.
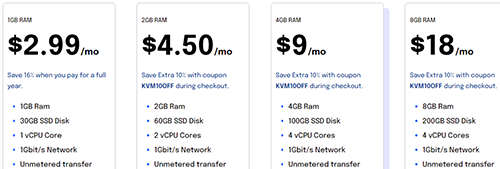 Select your Plan

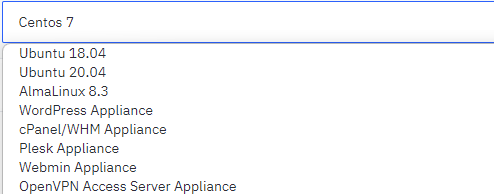
Select “WikiJS Appliance” from Operating system dropdown.
All our servers and applications come with unmetered bandwidth. This means no more overage charges, no downtime due to server suspension, less hassle and more happy customers.
 Select your Plan
Initial Setup and Details
For best results we recommend pointing your domain name to your server IP before continuing further.
If you already have a vps and would like to rebuild it with WikiJS, click the Rebuild button in your account, and select “Linux Ubuntu 20.04 X86 64 WikiJS Gen2 V1”

After you deploy a One-Click VPS, our system will begin the app installation automatically upon first boot. The process might take between 5 and 30 minutes to complete. To monitor the progress, please login to your server via SSH. As soon as you do, you will be presented with a message informing you whether the installation is still ongoing, or if it has completed. If the installation has been successfully completed, you will be presented with the next steps you need to take in order to finish setting up your app. Example information:
WikiJs is installed. You can access it at http://10.10.250.32
You can stop/start it by using the following command:
systemctl status/stop/start wiki

Configuration file is located in /var/wiki/config.yml
To enable SSL, first point your domain to your vps ip 10.10.250.32
Then edit /var/wiki/config.yml
Under the ssl: section change:
enabled: false to enabled: true
provider: letsencrypt - should already exist
domain: wiki.yourdomain.com - replace wiki.yourdomain.com with your actual domain
subscriberEmail: [email protected] - replace [email protected] with your actual email address
Then run: systemctl restart wiki and give it about 2 minutes for it to issue and install the SSL
Why choose Cloudfanatic for your Premium WikiJS hosting

Trusted by tens of thousands of clients, Cloudfanatic gives you fast, reliable, secure and affordable hosting.

Enterprise Hardware
All our server are equipped with enterprise server grade hardware for maximum performance and stability. Intel E5 processors and pure SSD drives in RAID configuration will push your server to its limits.
Unmetered Bandwidth
All vps come with unmetered bandwidth. This to you means no more overage charges, no server suspension due to exceeded bandwidth allocation, less hassle and of course more happy customers.
99.9% uptime
With a N+1 philosophy throughout our hardware, we stand behind our services and work day and night to ensure maximum reachability and uptime for your servers. If we fail to meet our uptime promise, you will be compensated.
Pure SSD storage
With our RAID protected SSD storage, customers can enjoy blazing fast disk, capable of handling any type of applications.
IPv6 Support
We provide both IPv4 and IPv6 connectivity on all our packages. It also comes with reverse dns support. Develop and host for the next generation internet protocol in any of our locations.
Full Root Access
Have full control over your vps. Install, configure and optimize any aspect of your server..
Deploy Instantly
Your virtual servers are guaranteed to be online in 3 minutes or less. This allows you to start your work immediately unlike other providers where you have to wait hours or even days for your server.
Multiple Location
Instantly deploy servers in our Chicago, Los Angeles, Raleigh or Phoenix datacenter to best fit your needs. Deploy as many instances as you need in seconds.
Offsite Backups
Have a peace of mind by purchasing our weekly offsite backup addon. With it our system will take a backup of your server and store it on our secures servers in case something happens.